Blog

  • The Science of Tempura: Why Ice-Cold Water Makes the Lightest Batter

    The Science of Tempura: Why Ice-Cold Water Makes the Lightest Batter

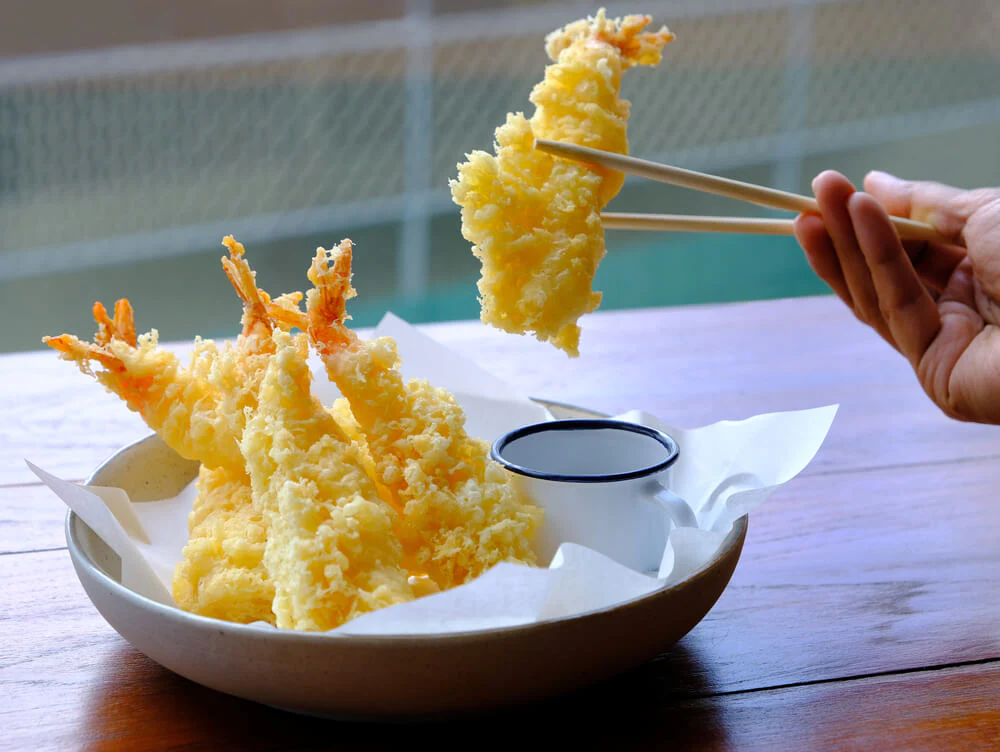
    There is something almost magical about the perfect piece of tempura. When done correctly, the coating is a pale, lacy, and impossibly crisp veil that shatters upon impact, revealing succulent seafood or tender vegetables beneath. Achieving this texture isn’t just a matter of culinary luck; it is a fascinating lesson in chemistry. The secret to that ethereal crunch lies almost entirely in temperature control. By understanding the science of tempura and why ice-cold water makes the lightest batter, you can transform a heavy, oily fry into a delicate masterpiece that defines high-end Japanese cuisine.


    1. The Enemy of Crispness: Gluten Development

    Gluten is the protein network that gives bread its chew, but it is the ultimate villain in tempura. When flour meets water, proteins called glutenin and gliadin bond. Using ice-cold water slows this chemical reaction significantly, ensuring your batter remains thin and crisp rather than bready.

    2. Temperature and Molecular Movement

    At a molecular level, heat provides energy. Warm water encourages molecules to move and bond faster, accelerating gluten formation. Cold water keeps these molecules sluggish. By keeping the batter chilled, you buy yourself more time to coat the food before the texture turns tough and doughy.

    3. The Role of Wheat Starch

    Tempura batter typically uses low-protein cake flour. When mixed with ice-cold water, the starch granules in the flour stay separated. This prevents the “clumping” that occurs in warmer environments, allowing the batter to spread thinly and evenly across the surface of your ingredients.

    4. Maximizing the Temperature Shock

    The “leap” in temperature is vital. When ice-cold batter hits 180°C oil, the water evaporates almost instantly. This rapid evaporation creates tiny steam pockets, puffing up the batter and creating that signature airy structure. A larger temperature gap creates a more dramatic and effective crisping effect.

    5. Carbonation as a Secret Weapon

    Many chefs substitute ice-cold still water with sparkling water. The dissolved carbon dioxide creates even more air bubbles within the chilled mixture. When combined with the low-temperature science of tempura, these bubbles expand in the hot oil, resulting in an even lighter, “lace-like” finish.

    6. Minimizing Over-Mixing

    Because cold water inhibits gluten, you don’t need to whisk the batter until smooth. In fact, leaving lumps is preferred. Over-mixing creates a structural strength that traps moisture; a lumpy, cold batter releases moisture quickly in the fryer, which is essential for long-lasting crunch.

    7. Preventing Oil Absorption

    A heavy, warm batter acts like a sponge, soaking up oil and becoming greasy. A cold, thin batter creates a protective steam barrier. As the cold water turns to steam, the outward pressure prevents the frying oil from penetrating deep into the batter or the food.

    8. The Importance of “Just-in-Time” Mixing

    Even with ice-cold water, gluten will eventually form if the batter sits. Professional chefs mix small batches with ice cubes right before the ingredients hit the oil. This “just-in-time” approach ensures the temperature remains at its lowest possible point for every single fry.

    9. Controlling Enzyme Activity

    Wheat flour contains natural enzymes that can break down starches into sugars. These enzymes are more active in warm environments. By using ice water, you suppress this activity, preventing the batter from browning too quickly and ensuring that classic, pale golden tempura aesthetic.

    10. Thermal Conductivity of the Batter

    Ice-cold water lowers the overall starting temperature of the food’s “shell.” This means the outside takes slightly longer to cook than the inside, allowing the vegetable or shrimp to steam perfectly in its own juices while the exterior achieves a crystalline, brittle structure.

    11. The Science of the “Bloom”

    When cold batter hits hot oil, it “blooms” or spreads. If the batter is warm, it sets too quickly into a thick glob. Chilled batter remains fluid for a split second longer in the oil, allowing it to stretch into those delicate, spindly “fingers” of crunch.

    12. Using Chilled Bowls and Chopsticks

    True tempura masters don’t just stop at ice water. They often chill the mixing bowl and even the flour. Using long chopsticks for mixing, rather than a whisk, reduces the mechanical energy and heat transferred from your hands, keeping the gluten dormant and the batter cold.

    13. The Impact of Evaporative Cooling

    As the cold water in the batter begins to heat up in the fryer, it undergoes evaporative cooling. This process regulates the temperature of the ingredient inside, preventing delicate items like shiso leaves or sea urchin from overcooking before the crust is set.

    14. Creating the Perfect Steam Jacket

    Tempura is essentially a steaming method wrapped in a frying method. The ice-cold batter forms a sealed jacket. The intense heat of the oil turns the moisture inside the food into steam, which is trapped by the rapidly setting, cold-activated batter shell.

    15. The Visual Indicator: Pale Gold

    A batter made with warm water browns deeply because of the sugar breakdown and density. However, the science of tempura dictates that the lightest batter should stay pale. Ice-cold water ensures the coating stays thin enough that it doesn’t caramelize heavily, preserving the food’s natural flavor.


    SEO Meta Description

    Learn the science of tempura and why ice-cold water makes the lightest batter. Master the secrets of gluten inhibition and temperature shock for perfect crispy results.

    Focus Keywords

    • Science of tempura
    • Ice-cold tempura batter
    • Lightest tempura coating
    • Gluten in frying
    • Japanese frying techniques
    • How to make crispy tempura
    • Tempura chemistry

    FAQ Section

    Q: Can I use regular tap water for tempura? A: You can, but it won’t be as crispy. Using ice-cold water or even adding ice cubes to the water is essential to prevent gluten development and achieve a light, airy texture.

    Q: Why should the batter be lumpy? A: Over-mixing to remove lumps creates gluten, which makes the batter tough and bready. Lumps indicate that the batter hasn’t been overworked, which is key to a shattering crunch.

    Q: Does the type of flour matter? A: Yes. Low-protein flours like cake flour or specialized tempura flour are best. Combined with ice-cold water, they ensure the lowest possible gluten formation.

    Internal Linking Suggestions

    1. The Ultimate Guide to Choosing the Best Frying Oils: A deep dive into smoke points and flavor profiles.
    2. How to Prepare Seafood for Frying: Tips on cleaning and drying shrimp and fish for the best batter adhesion.
    3. Vegetable Tempura 101: The best vegetables to use and how to slice them for even cooking.

    Conclusion

    Mastering the science of tempura is all about managing the relationship between temperature and texture. By using ice-cold water, you effectively “pause” gluten development, allowing the intense heat of the oil to create a light, vaporous crust that doesn’t feel heavy or greasy. It is a delicate balance of extremes—ice and fire—that results in the world’s most sophisticated fried food. Apply these chilled techniques to your next kitchen experiment for restaurant-quality results.

  • Ramen Broth Mastery: How to Get 12-Hour Flavor in Just 30 Minutes

    Ramen Broth Mastery: How to Get 12-Hour Flavor in Just 30 Minutes

    We’ve all been there: craving a steaming bowl of authentic, soul-warming ramen but lacking the ten-plus hours required to simmer bones into a traditional tonkotsu. While the slow-cooked method is a culinary art form, modern life demands a shortcut. Achieving ramen broth mastery doesn’t always require a literal day at the stove. By utilizing high-impact umami boosters and specific searing techniques, you can develop a rich, complex liquid gold that tastes like it has been bubbling away since dawn. This guide explores how to cheat the clock and get 12-hour flavor in just 30 minutes.

    1. The Power of Quality Stock

    Start with a high-quality store-bought low-sodium chicken or vegetable stock. This acts as your canvas. Avoid using just water; a pre-made base provides a foundational body that allows your quick-simmered aromatics to shine without tasting thin or watery.

    2. Searing the Aromatics

    Don’t just toss onions and ginger into the pot. Char them first. Halve an onion and a knob of ginger, then sear them in a dry pan until blackened. This “burnt” exterior mimics the deep, smoky complexity found in long-boiled traditional broths.

    3. The Garlic Paste Secret

    Instead of sliced garlic, use a microplane to create a fine garlic paste. Sautéing this for just thirty seconds in sesame oil releases its essential oils instantly, distributing a pungent, savory base throughout the liquid much faster than whole cloves ever could.

    4. Mushroom Umami Bomb

    Dried shiitake mushrooms are an essential shortcut. Even a 15-minute steep in hot broth releases guanylate, a natural flavor enhancer. This provides that “earthy” depth usually achieved by simmering pork bones for several hours in a traditional kitchen.

    5. Kombu: The Sea’s MSG

    A small piece of dried kelp (kombu) is a secret weapon for ramen broth mastery. It is packed with natural glutamates. Let it sit in the simmering broth for 10 minutes to add a subtle oceanic richness that rounds out the saltiness.

    6. Miso Paste Integration

    Whisking in a tablespoon of red or white miso paste at the very end adds instant fermented complexity. Miso provides a “long-aged” fermented funk and a creamy mouthfeel that mimics the collagen breakdown typically found in a 12-hour tonkotsu broth.

    7. Toasted Sesame Oil Finish

    A drizzle of toasted sesame oil at the end of the 30-minute mark adds a layer of nutty aroma. This fat coats the palate, creating a luxurious “fatty” sensation that tricks the brain into thinking the broth is much richer than it is.

    8. Soy Sauce Selection

    Use a high-quality Shoyu (Japanese soy sauce) rather than generic supermarket brands. Shoyu is aged and contains complex esters that provide a brewed, sophisticated saltiness. It acts as a shortcut to the “tare” seasoning typically developed over many hours.

    9. The Miracle of Tahini

    If you want a creamy, “milky” broth like tonkotsu, whisk in a teaspoon of tahini or peanut butter. This introduces emulsified fats and proteins, instantly thickening the liquid and providing the opaque, rich appearance of a long-simmered bone broth.

    10. Fish Sauce for Depth

    A dash of high-quality fish sauce might sound strange for ramen, but it is an umami powerhouse. It provides a fermented salty kick that mirrors the depth of dried sardines (niboshi) used in professional ramen shops across Japan.

    11. Anchovy Paste Shortcut

    Like fish sauce, a tiny squeeze of anchovy paste melts into the broth invisibly. It boosts the savory profile significantly, providing a meaty backbone that replaces the need for simmering kilograms of pork and chicken bones all day.

    12. Instant Dashi Powder

    Keep a jar of Hon-Dashi (instant bonito flakes powder) in your pantry. A half-teaspoon adds a smoky, fish-based complexity that would otherwise take hours of steeping and straining to achieve. It is the ultimate “30-minute” flavor hack.

    13. Pork Fat or Lard

    Professional ramen is often topped with a “flavor oil.” Adding a small amount of rendered lard or bacon fat to your 30-minute broth mimics the heavy mouthfeel of animal fats that have rendered out during a 12-hour boil.

    14. Mirin for Balance

    A splash of mirin introduces a subtle sweetness and a glossy sheen to the broth. This sweetness balances the heavy salt and umami components, creating a multi-dimensional flavor profile that tastes intentional and highly sophisticated.

    15. Scallion Whites vs. Greens

    Sauté the white parts of scallions at the beginning with your ginger to build flavor. Save the green parts for the garnish. This dual-use strategy ensures the onion flavor is cooked into the broth while maintaining a fresh bite on top.

    16. Concentrated Bone Broth

    If you can find “bone broth” concentrates in the store, use them. These are essentially reduced long-cook stocks. Reconstituting them with fresh aromatics gives you a head start, putting you at “hour ten” flavor in about two minutes.

    17. The Role of Star Anise

    Adding just one star anise pod for 10 minutes provides a faint, licorice-like top note. This is a common “secret ingredient” in many shops that adds an unidentifiable but deeply satisfying complexity to the aromatic profile.

    18. Nutritional Yeast Hack

    For a vegan broth, nutritional yeast adds a cheesy, nutty, and savory depth. It helps replicate the savory “cloy” that meat-based stocks have, making a 30-minute vegetable broth feel much more substantial and satisfying on the tongue.

    19. Correct Salt Timing

    Never salt your broth at the beginning. Salt the broth at the very end after it has reduced slightly. This ensures the saltiness is perfectly balanced and doesn’t become overpowering, preserving the delicate balance of your quick-built flavors.

    20. Pressure Cooker Hybrid

    If you have 30 minutes and an Instant Pot, use it. High pressure accelerates the extraction of flavor from aromatics and bones significantly. It’s the closest scientific equivalent to “folding time” when it comes to making professional-grade soup.


    SEO Meta Description

    Achieve ramen broth mastery with these expert tips. Learn how to get 12-hour flavor in just 30 minutes using umami-rich shortcuts and professional techniques.

    Focus Keywords

    • Ramen broth mastery
    • Quick ramen recipe
    • 30 minute ramen broth
    • Easy umami boosters
    • Authentic ramen shortcuts
    • Miso ramen tips

    FAQ Section

    Q: Can I make this broth vegetarian? A: Absolutely. Use a vegetable base and rely heavily on dried shiitake mushrooms, kombu, and miso paste to provide the necessary umami without using meat products.

    Q: Does 30-minute broth store well? A: Yes, it actually tastes even better the next day as the aromatics continue to meld. Store it in an airtight container in the fridge for up to 4 days.

    Q: What is the best noodle for this broth? A: Look for fresh alkaline noodles in the refrigerated section of an Asian grocer. If unavailable, high-quality dried ramen noodles or even “lo mein” noodles work well.

    Internal Linking Suggestions

    1. The Ultimate Guide to Ramen Toppings: From Ajitsuke Tamago to Chashu.
    2. 5 Umami Ingredients Every Pantry Needs: How to level up your home cooking.
    3. Comparing Miso: The difference between Red, White, and Yellow miso pastes.

    Conclusion

    Achieving ramen broth mastery is about working smarter, not harder. While traditional methods are respected for a reason, you don’t need a whole day to enjoy a world-class bowl of soup. By layering aromatics, using fermented pastes, and harnessing the power of umami-rich ingredients like kombu and mushrooms, you can create a rich, complex broth in half an hour. Now, grab your favorite noodles and start simmering!

  • Sushi for Newbies: 5 Incredible Options for People Who Dislike Raw Fish

    Sushi for Newbies: 5 Incredible Options for People Who Dislike Raw Fish

    When many people hear the word “sushi,” their minds immediately jump to images of cold, slimy raw fish. This common misconception often prevents foodies from exploring one of the most diverse and artistic cuisines in the world. The truth is that sushi actually refers to the seasoned vinegar rice, not the topping itself. If you are hesitant about uncooked seafood, you are in luck! There are plenty of cooked, vegetarian, and even meat-based varieties available. This guide explores sushi for newbies by highlighting five incredible options for people who dislike raw fish, ensuring you can enjoy the sushi bar experience without any hesitation.


    1. Understanding What Sushi Really Means

    The word “sushi” actually refers to the vinegared rice used in the dish, not the fish itself. Knowing this helps beginners realize that the possibilities for toppings and fillings are virtually endless, ranging from cooked meats to fresh, crunchy vegetables.

    2. The Appeal of the California Roll

    The California Roll is the ultimate “gateway” sushi. It features imitation crab (which is cooked and shredded), creamy avocado, and refreshing cucumber. Since everything is fully cooked or plant-based, it provides a safe and delicious entry point for any newcomer.

    3. Why Imitation Crab is a Safe Bet

    Known as surimi, imitation crab is made from white fish that has been cooked and flavored. It has a mild, sweet taste and a firm texture, making it perfect for those who are wary of the texture associated with raw seafood.

    4. Exploring the Shrimp Tempura Roll

    If you love crunchy textures, the Shrimp Tempura Roll is a must-try. The shrimp is battered and deep-fried until golden brown before being rolled with rice. It offers a familiar, savory flavor that feels more like a gourmet snack than “scary” sushi.

    5. The Magic of Eel (Unagi)

    Unagi, or freshwater eel, is always served grilled and brushed with a thick, sweet soy-based glaze. The texture is flaky and rich, much like a piece of well-cooked steak or poultry, making it a favorite for those who prefer cooked proteins.

    6. Sweet and Savory Eel Sauce

    The dark, syrupy sauce drizzled over eel rolls is often called “nitsume.” It tastes similar to BBQ sauce but with a refined Japanese twist. It’s so delicious that many beginners find it becomes their favorite part of the entire sushi meal.

    7. Sweet Potato Tempura Rolls

    Vegetarian sushi is a fantastic alternative for those avoiding raw fish. A sweet potato tempura roll features crispy, fried potato wedges inside the rice. It’s hearty, comforting, and provides a satisfying crunch that pairs beautifully with spicy mayo or eel sauce.

    8. The Versatility of Avocado Rolls

    Simple yet elegant, the avocado roll is perfect for those who want a creamy texture without the “fishy” taste. Avocado is packed with healthy fats and provides a buttery mouthfeel that complements the tangy acidity of the seasoned sushi rice.

    9. Tamago: The Japanese Omelet

    Tamago is a sweet, layered omelet that is often served as nigiri (on top of a small mound of rice). It is fully cooked and has a light, fluffy consistency. It’s an excellent palate cleanser or a kid-friendly option for sushi beginners.

    10. The Bold Flavor of Spicy Chicken Rolls

    While less traditional, many modern sushi fusion restaurants offer cooked chicken rolls. These often feature grilled or fried chicken strips paired with spicy sauce and cucumber, bridging the gap between familiar Western flavors and the Japanese sushi format.

    11. Cucumber Rolls (Kappa Maki)

    For a refreshing and light bite, the Kappa Maki is a classic. It’s a simple roll containing only crisp cucumber. It’s an excellent way to appreciate the quality of the sushi rice and the seaweed (nori) without any overwhelming flavors.

    12. Inari Sushi: Sweet Tofu Pockets

    Inari sushi consists of a pouch of fried, seasoned tofu stuffed with sushi rice. The tofu is simmered in a sweet broth, giving it a juicy and savory flavor. It contains no fish at all and is incredibly filling for beginners.

    13. The Role of Nori (Seaweed)

    Nori is the toasted seaweed wrap used in most rolls. It provides a subtle toasted flavor and a boost of minerals. For those sensitive to the taste of the sea, look for “Inside-Out” rolls where the rice is on the exterior.

    14. Using Wasabi and Ginger Correctly

    Pickled ginger is meant to cleanse your palate between different types of rolls, while wasabi adds a spicy kick. If you’re nervous about raw flavors, a little extra ginger can provide a familiar, zesty zing to your cooked rolls.

    15. The Importance of Soy Sauce Balance

    When eating cooked rolls like Shrimp Tempura, a light dip in soy sauce enhances the umami flavors. Avoid soaking the rice; instead, lightly dip the corner to keep the textures intact and the flavors balanced.

    16. Checking the Menu for “Tempura”

    When browsing a sushi menu, look for the word “Tempura.” This almost always guarantees that the protein inside has been battered and deep-fried, ensuring it is fully cooked and possesses a familiar, approachable fried texture.

    17. Identifying “Smoked” Options

    Some sushi uses smoked fish, such as smoked salmon in a Philadelphia Roll. While technically “raw,” the smoking process cures the fish, giving it a firm texture and a salty, cooked-like flavor that many find more palatable.

    18. The Creaminess of the Philadelphia Roll

    The Philadelphia Roll typically includes smoked salmon, cream cheese, and cucumber. The richness of the cream cheese masks much of the fish flavor, making it a popular choice for those transitioning toward more traditional sushi styles.

    19. Fried Tofu (Agedashi) Accompanying Sushi

    If you aren’t ready for a full plate of rolls, ordering side dishes like Agedashi Tofu is a great strategy. This allows you to enjoy the atmosphere of a sushi restaurant while sticking to warm, cooked, vegetarian-friendly appetizers.

    20. Customizing Your Order

    Most sushi chefs are happy to accommodate “no raw” requests. You can often ask for a “Spider Roll” (soft-shell crab) or a “Dynamite Roll” to be prepared with extra care to ensure all seafood elements are thoroughly cooked.

    21. Don’t Fear the Seaweed Salad

    A side of Wakame (seaweed salad) is a great accompaniment to cooked sushi. It’s sweet, crunchy, and sesame-scented. It offers a nutritional boost and helps normalize the “oceanic” flavors of a sushi dinner without involving raw fish.


    Conclusion

    Stepping into a sushi restaurant doesn’t have to be intimidating if you aren’t a fan of raw seafood. By focusing on cooked ingredients like shrimp tempura, grilled eel, or crispy vegetables, you can enjoy a world-class dining experience. Sushi for newbies is all about exploration and finding the textures and flavors that suit your palate. Don’t be afraid to ask your server for recommendations—there is a delicious roll waiting for everyone!


    SEO Meta Description

    Looking for sushi for newbies? Discover 5 incredible sushi options for people who dislike raw fish, featuring cooked, crunchy, and vegetarian-friendly rolls.

    Focus Keywords

    • Sushi for newbies
    • Cooked sushi rolls
    • Best sushi for beginners
    • Sushi without raw fish
    • California roll ingredients
    • Shrimp tempura roll
    • Vegetarian sushi options

    FAQ Section

    Q: Is all sushi raw? A: No! Sushi refers to the vinegared rice. Many types of sushi feature cooked seafood, fried vegetables, or even egg and tofu.

    Q: What is the best sushi roll for someone who hates fishy tastes? A: The Sweet Potato Tempura Roll or a simple Avocado Roll are great choices, as they offer zero fish flavor while still providing the classic sushi experience.

    Q: Can I get food poisoning from cooked sushi? A: Cooked sushi carries the same low risk as any other cooked restaurant meal. Since the ingredients are heated through, they are much safer for those concerned about raw food safety.

    Internal Linking Suggestions

    1. The Beginner’s Guide to Japanese Condiments: How to use wasabi, ginger, and soy sauce.
    2. Top 10 Vegetarian Japanese Dishes You Need to Try: Beyond just sushi rolls.
    3. Miso Soup 101: Why this fermented soup is the perfect starter for every meal.
  • Chinese Tea Culture: The Best Blends to Improve Your Digestion

    Chinese Tea Culture: The Best Blends to Improve Your Digestion

    Chinese tea culture is a sophisticated tapestry of tradition, philosophy, and wellness that has spanned millennia. Beyond the delicate aromas and ceremonial grace, the primary appeal for many enthusiasts lies in its profound medicinal properties. Specifically, the relationship between Chinese tea culture and digestive health is a cornerstone of Traditional Chinese Medicine (TCM). From the fermented depth of Pu-erh to the floral notes of Chrysanthemum, certain blends act as natural catalysts for gut health. This guide explores how these ancient brews can soothe your stomach, eliminate bloating, and transform your post-meal experience into a ritual of restoration.


    1. The Ancient Roots of Tea as Medicine

    In China, tea was originally discovered and used as a medicinal tonic. Ancient scholars and healers recognized that specific leaves possessed “cooling” or “warming” properties that directly influenced the stomach’s ability to process heavy, oily, or complex modern meals.

    2. Pu-erh: The King of Post-Meal Digestion

    Pu-erh is perhaps the most famous blend for digestion. This fermented tea contains natural microflora and “good bacteria” similar to probiotics. Drinking it after a rich dinner helps break down fats and eases the heavy sensation of overeating.

    3. Understanding the “Warming” Effect

    In TCM, a “cold” stomach leads to sluggish digestion and bloating. Roasted oolongs or aged black teas provide a “warming” energy. This heat stimulates the metabolic fire, ensuring that nutrients are absorbed efficiently while waste is moved along.

    4. Barley Tea (Damai Cha) for Bloating

    While technically a grain tea, Damai Cha is a staple in Chinese households during summer. It is caffeine-free and specifically targeted at reducing abdominal distension. Its toasted flavor profile acts as a gentle digestive aid that settles an acidic stomach.

    5. Oolong Tea and Lipid Metabolism

    Oolong occupies the space between green and black tea. It is semi-oxidized, making it incredibly effective at emulsifying fats. Many people drink Tieguanyin oolong to help the body process greasy foods more effectively without feeling lethargic.

    6. Ginger and Red Date Infusions

    Often blended with black tea, ginger provides a spicy kick that increases digestive enzymes. Combined with red dates (Jujube), this blend tonifies the spleen and “Qi,” providing the energy your internal organs need to function at their peak.

    7. The Role of Green Tea’s Catechins

    Green tea is packed with polyphenols, particularly EGCG. These antioxidants help reduce inflammation in the gastrointestinal tract. However, it is best enjoyed about 30 minutes after eating to avoid interfering with the absorption of essential minerals like iron.

    8. Chrysanthemum Tea for “Liver Heat”

    When digestion is hindered by stress or “heat,” Chrysanthemum tea offers a cooling relief. It helps detoxify the liver, which in turn supports bile production. This flow is essential for the breakdown of fats during the digestive cycle.

    9. Hawthorn Berry (Shan Zha) Blends

    Dried hawthorn berries are frequently added to tea blends specifically to treat “food stagnation.” If you feel like your food is simply “sitting” in your stomach, the natural tartness of hawthorn stimulates gastric juices to accelerate breakdown.

    10. The Importance of Water Temperature

    In Chinese tea culture, the temperature of the water is as important as the leaves. Drinking iced tea can “shock” the digestive system. Using water at $80^\circ\text{C}$ to $100^\circ\text{C}$ ensures the tea’s medicinal oils are properly released.

    11. White Tea for Gentle Cleansing

    For those with sensitive stomachs, Silver Needle white tea is the perfect choice. It is the least processed variety, providing a high concentration of antioxidants without the astringency that can sometimes irritate a delicate gut lining.

    12. Timing Your Tea for Maximum Benefit

    To optimize digestion, timing is everything. Drinking tea immediately before a meal can dilute digestive juices. The “sweet spot” is usually 20 to 30 minutes after your last bite to assist the natural movement of the gut.

    13. The Art of Mindful Sipping

    Digestion begins in the brain. The ritual of preparing Chinese tea encourages a parasympathetic state (rest and digest). By slowing down and focusing on the tea’s aroma, you signal your body to relax and process food properly.

    14. Tangerine Peel (Chen Pi) Additions

    Aged tangerine peel is a secret weapon in Chinese tea blends. It is believed to “regulate Qi” and dry up dampness in the body. Adding a small piece to your Pu-erh can significantly reduce gas and bloating.

    15. Black Tea (Hong Cha) for Gastric Comfort

    Unlike green tea, Chinese black tea is fully oxidized. This process makes it gentler on the stomach lining. It is often recommended for those who suffer from occasional acid reflux or a sensitive stomach during the winter months.

    16. Jasmine Tea for Stress-Related Gut Issues

    Stress is a leading cause of IBS and digestive discomfort. Jasmine tea’s soothing floral scent has a sedative effect on the nervous system. When your mind relaxes, your gut muscles follow suit, preventing stress-induced cramping.

    17. Avoiding Sugar and Milk

    To reap the digestive benefits of Chinese tea, it should be consumed plain. Adding milk or sugar can actually cause fermentation in the gut, leading to the very bloating and gas you are trying to avoid.

    18. The Spleen-Stomach Connection

    In Chinese medicine, the Spleen and Stomach work as a pair. Tea blends that support the Spleen, such as those containing Astragalus or Licorice root, provide the foundational strength needed for long-term digestive health.

    19. Gongfu Tea: Small Sips, Big Impact

    The Gongfu tea ceremony uses small cups for a reason. Consuming tea in small, concentrated doses allows the body to absorb the compounds without overwhelming the bladder or diluting the stomach’s natural acids too quickly.

    20. Rose Tea for Harmonizing Flow

    Dried rosebuds are often mixed with light oolongs. Rose tea is known to move “stagnant Qi” in the chest and abdomen. It is particularly helpful for those who feel physical tension in their stomach during times of emotional worry.

    21. Choosing High-Quality Loose Leaf

    To improve digestion, quality matters. Avoid “dust” found in cheap tea bags, which can be high in fluoride and tannins. Loose-leaf teas contain the essential oils and whole nutrients necessary for a therapeutic effect.


    SEO Meta Description

    Discover how Chinese tea culture can transform your gut health. Learn about the best tea blends like Pu-erh and Oolong to improve your digestion and reduce bloating naturally.

    Focus Keywords

    • Chinese tea culture
    • Best tea for digestion
    • Pu-erh tea benefits
    • Natural bloating remedies
    • Chinese herbal tea
    • Gut health tea blends
    • Traditional Chinese Medicine tea

    FAQ Section

    Q: Which Chinese tea is best for bloating?

    A: Pu-erh and Barley tea (Damai Cha) are widely considered the best for bloating. Pu-erh helps break down heavy fats, while Barley tea settles the stomach and reduces gas.

    Q: Can I drink green tea on an empty stomach?

    A: It is generally not recommended. The high tannin content in green tea can stimulate the secretion of stomach acid, which may cause nausea or discomfort if your stomach is empty.

    Q: How many cups of tea should I drink for digestive benefits?

    A: Most practitioners suggest 2 to 3 cups a day, preferably after meals. Consistency is more important than quantity when using tea as a wellness tool.

    Internal Linking Suggestions

    1. The Ultimate Guide to Brewing Loose Leaf Tea at Home – Perfect for readers who want to learn the technical side of preparation.
    2. Top 10 Superfoods for Gut Health – A great follow-up for readers interested in the broader topic of digestion.
    3. The History of the Tea Ceremony – Provides more cultural context for those interested in the origins of Chinese tea.

    Conclusion

    Integrating Chinese tea culture into your daily routine is a simple yet powerful way to support your digestive system. Whether you choose the fermented richness of Pu-erh or the soothing floral notes of Jasmine, these ancient blends offer a natural, time-tested path to wellness. By prioritizing quality leaves and mindful brewing, you can turn every meal into an opportunity for healing. Start with one cup today and feel the difference in your gut health.

  • Congee Comfort: The Best Healing Meal for Cold Weather and Recovery

    Congee Comfort: The Best Healing Meal for Cold Weather and Recovery

    When the temperature drops or your immune system takes a hit, nothing provides solace quite like a steaming bowl of congee. Often described as the ultimate Asian soul food, congee is a silky rice porridge that has served as a cornerstone of wellness for centuries. It is more than just a meal; it is a gentle embrace for a weary body. By simmering rice in a large volume of liquid until it breaks down into a creamy consistency, you create a dish that is exceptionally easy to digest and incredibly versatile. Whether you are battling a winter chill or recovering from illness, congee stands out as the best healing meal for cold weather and recovery.


    1. The Ancient Roots of Congee

    Congee, known as jook in Cantonese or zhou in Mandarin, has been a medicinal staple in Asian cultures for millennia. Historically, it was used to stretch grain supplies during lean times while providing a hydrating, nutrient-dense base that could be easily fortified with herbs.

    2. Why It Is Ideal for Digestion

    The long simmering process breaks down the starch in the rice, making it “pre-digested” in a sense. This allows your gastrointestinal tract to absorb nutrients with minimal effort, which is crucial when your body is channeling its energy toward fighting off a virus or infection.

    3. Maximum Hydration in Every Spoonful

    Unlike dry rice dishes, congee uses a high water-to-grain ratio, often 7:1 or even 10:1. This makes it an excellent tool for rehydration, especially if you have been suffering from a fever or a stomach bug that has left you feeling depleted.

    4. The Perfect Canvas for Flavors

    On its own, congee is mild and neutral. This makes it the perfect vehicle for a variety of toppings and seasonings. You can pivot from a savory breakfast with soy sauce and scallions to a soothing medicinal bowl infused with ginger and goji berries.

    5. Using High-Quality Rice Varieties

    While jasmine rice is the standard for its floral aroma and soft texture, you can experiment with short-grain sushi rice for extra creaminess. For a healthier twist, mixing in a bit of brown rice or millet adds fiber and a nutty depth to the flavor profile.

    6. The Magic of Homemade Bone Broth

    To elevate congee from a simple porridge to a healing powerhouse, swap water for homemade chicken or beef bone broth. The collagen and minerals found in bone broth support gut health and joint recovery, making the meal even more restorative for the body.

    7. Ginger: The Anti-Inflammatory Hero

    Adding sliced ginger to the pot while the rice simmers is a classic technique. Ginger contains gingerol, which helps reduce nausea and inflammation. It also provides a warming sensation that is particularly comforting when you are shivering from a winter cold.

    8. Garlic for Immune Support

    Finely minced garlic can be stirred in at the end or fried as a topping. Garlic is rich in allicin, a compound known for its immune-boosting properties. It adds a punch of savory flavor while helping your body ward off seasonal sniffles.

    9. Incorporating Lean Proteins

    For a recovery meal, adding poached chicken breast, white fish, or silken tofu provides the protein necessary for tissue repair. These proteins are soft and easy to chew, ensuring the meal remains gentle on a sensitive or sore throat.

    10. The Role of Fermented Toppings

    Toppings like pickled radish, fermented bean curd, or kimchi add probiotics to your bowl. Probiotics are essential for maintaining a healthy gut microbiome, which plays a massive role in your overall immune system strength and ability to recover quickly.

    11. Scallions and Fresh Herbs

    A handful of chopped scallions or cilantro adds a bright, fresh contrast to the rich porridge. These herbs are rich in vitamins A and C, providing a micro-nutrient boost that helps refresh the palate and clear the sinuses during a heavy cold.

    12. Using a Slow Cooker or Instant Pot

    While traditional stovetop simmering is meditative, modern appliances make congee accessible. An Instant Pot can produce a perfect, velvety consistency in just 20 minutes, while a slow cooker allows you to wake up to a warm, healing breakfast ready to eat.

    13. Managing Blood Sugar Levels

    While white rice has a high glycemic index, the high water content in congee lowers the overall glycemic load per serving. To keep energy levels stable, focus on adding healthy fats like sesame oil or fiber-rich vegetables like spinach and shiitake mushrooms.

    14. Shiitake Mushrooms for Vitamin D

    Dried or fresh shiitake mushrooms are a fantastic addition. They offer an earthy umami flavor and contain beta-glucans, which are known to enhance immune function. They also provide a plant-based source of Vitamin D, often lacking during the winter.

    15. The Comfort of Sesame Oil

    A final drizzle of toasted sesame oil adds healthy fats and an incredible aroma. The scent of sesame is psychologically soothing, and the fats help with the absorption of fat-soluble vitamins found in your other toppings and vegetables.

    16. Softening the Texture for Children

    Congee is an excellent “first food” for toddlers or a gentle meal for children who are feeling under the weather. Its soft, pudding-like texture is rarely rejected by picky eaters, and it can be flavored simply with a little salt and chicken.

    17. Customizing for Vegan Diets

    You don’t need meat to make a powerful healing congee. Using a rich vegetable stock made from kombu (seaweed) and dried mushrooms provides a deep savory flavor and essential minerals like iodine, keeping the meal entirely plant-based and restorative.

    18. Batch Cooking and Reheating

    Congee keeps well in the refrigerator for up to four days. It will thicken as it sits, so simply add a splash of water or broth when reheating on the stove to return it to its original silky, comforting consistency.

    19. The Psychological Benefits of Warmth

    There is a profound psychological benefit to consuming warm liquids during recovery. The steam helps clear nasal passages, while the warmth promotes a sense of safety and relaxation, which is vital for the body’s parasympathetic “rest and digest” state.

    20. Adding a Century Egg or Salted Egg

    For those seeking a traditional experience, adding a century egg or a salted duck egg provides a creamy, salty richness. These preserved eggs are packed with iron and protein, offering a flavor profile that is both complex and deeply satisfying.


    SEO Meta Description

    Discover why congee is the best healing meal for cold weather and recovery. Learn how to make this comforting rice porridge to boost immunity and aid digestion.

    Focus Keywords

    • Congee benefits
    • Healing rice porridge
    • Cold weather comfort food
    • Recovery meals for illness
    • Easy digestion recipes
    • Asian healing foods
    • Immune boosting soup

    FAQ Section

    Q: What is the best ratio of water to rice for congee? A: A standard ratio is 1 cup of rice to 7 or 8 cups of liquid for a medium consistency. For a thinner, more hydrating soup, use a 10:1 ratio.

    Q: Can I use leftover cooked rice to make congee? A: Yes! Simply simmer the cooked rice with extra broth or water for 15–20 minutes until the grains burst and the liquid becomes creamy.

    Q: Is congee good for an upset stomach? A: Absolutely. It is one of the gentlest foods for the digestive system, making it a staple for those recovering from food poisoning or stomach viruses.

    Internal Linking Suggestions

    1. The Ultimate Guide to Homemade Bone Broth: How to make the perfect base for soups and stews.
    2. Top 10 Anti-Inflammatory Spices to Keep in Your Pantry: Exploring the health benefits of ginger, turmeric, and more.
    3. Quick 30-Minute Winter Dinners: Healthy recipes to keep you warm and energized throughout the colder months.

    Conclusion

    Congee is more than just a simple bowl of rice; it is a time-tested remedy that balances nutrition, hydration, and comfort. Whether you are navigating a difficult recovery or simply looking for a way to stay warm during a harsh winter, this versatile dish provides everything your body needs to heal and thrive. By incorporating fresh ingredients and traditional techniques, you can transform a few pantry staples into the ultimate healing meal.

  • Manchurian Secrets: The Key to Achieving the Perfect Gravy Thickness

    Manchurian Secrets: The Key to Achieving the Perfect Gravy Thickness

    There is something undeniably comforting about a bowl of hot, saucy Manchurian, but the difference between a mediocre dish and a restaurant-quality masterpiece often lies in the texture. Achieving the perfect gravy thickness is an art form that balances flavor, sheen, and consistency. Whether you prefer the fiery kick of Gobi Manchurian or the savory depth of the chicken variety, the gravy serves as the soul of the dish. In this guide, we dive deep into the professional techniques and “secret” ingredients that ensure your sauce is never too watery or unpleasantly gloopy, but always just right.

    1. The Role of Cornstarch Slurry

    The most common method for achieving the perfect gravy thickness is a cornstarch slurry. Mixing cold water with cornstarch before adding it to the boiling sauce prevents clumps. It provides that signature glossy finish and immediate body that defines Indo-Chinese cuisine.

    2. Temperature Matters for Thickening

    Always add your thickening agent to a simmering liquid. If the sauce is boiling too vigorously, the starch may break down; if it is cold, it won’t activate. A gentle simmer allows the starch granules to swell and create a smooth, consistent texture.

    3. The Ratio of Water to Starch

    For a standard Manchurian gravy, a ratio of one tablespoon of cornstarch to two tablespoons of water is ideal. This creates a fluid liquid that integrates easily. Adjusting this ratio slightly allows you to control exactly how “velvety” the final sauce becomes.

    4. Avoiding the “Raw Starch” Taste

    To ensure your gravy tastes professional, cook the sauce for at least two minutes after adding the slurry. This “cook-off” period eliminates the gritty, floury taste of raw cornstarch, leaving behind only the rich flavors of your soy and chili sauces.

    5. Using All-Purpose Flour as a Backup

    While cornstarch is king, a small amount of all-purpose flour (maida) can be used for a more opaque, hearty thickness. However, use it sparingly, as it creates a heavier mouthfeel compared to the light, translucent shimmer provided by traditional cornstarch.

    6. The Impact of Soy Sauce Quality

    The sodium and sugar content in your soy sauce affects how the gravy sets. Dark soy sauce adds more body and a deeper color, while light soy sauce is thinner. Using a combination of both helps balance the flavor profile and the physical density.

    7. Aromatics as a Texture Base

    Finely minced ginger, garlic, and celery act as a structural base for your gravy. When sautéed correctly, these aromatics release oils that emulsify with the liquids, providing a subtle “grit” that helps the sauce cling to the Manchurian balls.

    8. Onion and Capsicum Surface Area

    The way you cut your vegetables matters. Large petals of onion and capsicum provide surfaces for the thick gravy to adhere to. This ensures that every bite is coated in sauce, rather than the vegetables just swimming in a thin liquid.

    9. The Secret of Tomato Ketchup

    Many chefs use tomato ketchup not just for sweetness, but for its pectin content. Pectin acts as a natural thickener and stabilizer, helping to bind the vinegar and soy sauce into a cohesive, thick Manchurian gravy that doesn’t separate.

    10. Managing Vinegar Acidity

    High acidity can sometimes thin out a starch-based sauce. If you find your gravy is too runny despite adding starch, check your vinegar levels. Add the vinegar early in the process so it mellows out before the final thickening step.

    11. Cornstarch vs. Arrowroot Powder

    If you want an even clearer, more premium shine, try arrowroot powder. It functions similarly to cornstarch but stands up better to acidic ingredients. It provides a “cleaner” feel on the palate and is excellent for gluten-free Manchurian variations.

    12. The Importance of Constant Stirring

    When pouring in your thickener, stir the wok constantly. This prevents the starch from settling at the bottom and burning, or forming “jelly lumps.” A continuous circular motion ensures the thickness is distributed evenly throughout the entire batch.

    13. Understanding “Carry-Over” Thickening

    Manchurian gravy continues to thicken as it cools. If you reach the perfect thickness while it’s still on the high flame, it might turn into a paste by the time it reaches the table. Aim for a slightly thinner consistency than your final goal.

    14. Balancing the Sugar Content

    Sugar or honey doesn’t just add sweetness; it creates a syrupy consistency. In Indo-Chinese cooking, a pinch of sugar helps the gravy achieve a “glaze” effect, making the dish look vibrant and appetizing under dining room lights.

    15. Deglazing the Wok

    Before adding your bulk liquid, deglaze the wok with a splash of stock or water. This lifts the caramelised bits of garlic and ginger from the bottom, incorporating those solids into the gravy for a naturally thicker, more flavorful base.

    16. Using Vegetable or Chicken Stock

    Instead of plain water, use a concentrated stock. The natural proteins and minerals in stock provide a richer “mouthfeel” that makes the gravy feel thicker and more substantial without actually increasing the amount of starch used.

    17. The Timing of the Manchurian Balls

    Never add your fried Manchurian balls until the gravy has reached the desired thickness. If they sit in the sauce while it boils and thickens, they will absorb too much liquid, becoming soggy and thinning out your carefully prepared sauce.

    18. Adjusting for “Dry” vs. “Gravy” Styles

    For Dry Manchurian, use half the liquid but the same amount of aromatics. The goal here is a “coating” consistency rather than a pourable sauce. The starch slurry should be thicker to ensure it sticks to the protein immediately.

    19. Using a High-Carbon Steel Wok

    The intense heat of a professional wok helps evaporate excess water quickly. This rapid evaporation concentrates the flavors and helps the starches gelatinize almost instantly, resulting in a superior texture compared to standard non-stick pans.

    20. Troubleshooting a Lumpy Sauce

    If lumps form, don’t panic. You can pass the gravy through a fine-mesh strainer before adding the vegetables and Manchurian balls. This saves the dish and ensures the silky-smooth texture that characterizes high-end Chinese restaurant cooking.


    SEO Meta Description

    Learn the professional Manchurian secrets for achieving the perfect gravy thickness. Master cornstarch ratios, timing, and heat control for restaurant-style results.

    Focus Keywords

    • Manchurian gravy thickness
    • Indo-Chinese cooking tips
    • Cornstarch slurry ratio
    • Perfect Manchurian sauce
    • How to thicken gravy
    • Restaurant-style Manchurian

    FAQ Section

    Q: Why is my Manchurian gravy turning watery after a few minutes? A: This usually happens if the cornstarch wasn’t cooked long enough or if the Manchurian balls released excess moisture. Ensure the sauce simmers for 2 minutes after adding the slurry.

    Q: Can I thicken Manchurian gravy without cornstarch? A: Yes, you can use arrowroot powder, potato starch, or a tiny amount of all-purpose flour, though cornstarch provides the best gloss and transparency.

    Q: How do I fix a gravy that is too thick? A: Simply whisk in a tablespoon of warm water or stock at a time over low heat until you reach your desired consistency.

    Internal Linking Suggestions

    1. The Ultimate Guide to Crispy Veg Manchurian Balls: A deep dive into getting the perfect crunch.
    2. Essential Indo-Chinese Pantry Staples: Must-have sauces and spices for your kitchen.
    3. Wok Hei Mastery: How to achieve smoky restaurant flavors at home.

    Conclusion

    Mastering the perfect gravy thickness is the final step in transitioning from a home cook to a culinary enthusiast. By understanding the science of starches, the importance of temperature, and the role of high-quality aromatics, you can create a Manchurian dish that rivals any restaurant. Remember, the secret lies in the balance of shine and substance. Keep experimenting with these techniques to find the consistency that best suits your personal palate.

  • Perfect Spring Rolls: Pro Tips for 100% Crispy and Non-Oily Results

    Perfect Spring Rolls: Pro Tips for 100% Crispy and Non-Oily Results

    There is nothing quite as satisfying as the audible crunch of a perfectly fried spring roll, yet achieving that golden, shatter-crisp exterior at home can be surprisingly elusive. We’ve all dealt with the disappointment of a soggy, oil-laden wrapper or a filling that leaks mid-fry. Mastering Perfect Spring Rolls requires more than just a good recipe; it demands an understanding of moisture control and temperature management. In this guide, we will dive into the pro tips and essential techniques to ensure your spring rolls are consistently light, non-greasy, and incredibly crispy every single time you cook.

    1. Choose the Right Wrapper

    Not all wrappers are created equal. For that signature glass-like crunch, look for wheat-based “spring roll pastry” found in the freezer section. Avoid heavy egg roll wrappers or rice paper used for fresh rolls, as these will not produce the same light, crisp texture when fried.

    2. Thaw Wrappers Properly

    Patience is key when handling frozen pastry. Thaw the package completely in the refrigerator or at room temperature while still sealed. If you try to peel them while they are still slightly frozen, they will tear, leading to holes that let oil seep into your filling.

    3. Keep a Damp Cloth Handy

    Spring roll wrappers dry out within minutes of being exposed to air. Once the package is open, keep the stack covered with a clean, slightly damp kitchen towel. This prevents the edges from becoming brittle and cracking during the rolling process, ensuring a tight seal.

    4. Squeeze Out Filling Moisture

    The biggest enemy of a crispy spring roll is internal steam. After stir-frying your vegetable or meat filling, place it in a fine-mesh strainer. Use a spoon to press out every drop of excess liquid. A dry filling ensures the wrapper stays crisp from the inside out.

    5. Let the Filling Cool Completely

    Never wrap hot filling. The heat creates immediate condensation on the inside of the cold wrapper, making it gummy before it even hits the oil. Spread your filling on a large tray to cool to room temperature or chill it in the fridge for the best results.

    6. Fine-Tune Your Vegetable Cut

    Consistency matters for the perfect bite. Julienne your vegetables into thin, uniform matchsticks. This ensures they cook quickly and evenly during the brief frying time. Thick chunks of vegetables can poke holes in the delicate pastry, causing the roll to absorb excess oil.

    7. The Cornstarch Slurry Secret

    To prevent spring rolls from unraveling in the fryer, use a “glue” made of cornstarch and water. This mixture creates a much stronger bond than plain water or egg wash. Apply a small dab to the final corner of the wrapper to lock everything in place.

    8. Master the Tight Roll

    Air pockets are the enemy of a non-oily result. When rolling, pull the pastry firmly over the filling to eliminate gaps. Air pockets trap oil during frying and cause the rolls to expand and potentially burst, leading to a greasy, unappealing texture.

    9. Don’t Overfill

    It is tempting to pack the rolls, but less is more. Use about two tablespoons of filling per roll. Overfilling makes it impossible to get a tight seal and increases the risk of the wrapper tearing as the steam expands during the frying process.

    10. Dust with Cornstarch

    If you are making a large batch, lightly dust the finished, uncooked rolls with a tiny bit of cornstarch. This absorbs any surface moisture that might develop while the rolls sit on the tray, ensuring they stay dry and ready for the hot oil.

    11. Choose an Oil with a High Smoke Point

    For deep frying, you need an oil that can handle heat without breaking down. Peanut, canola, or vegetable oils are ideal. Avoid olive oil or butter, which have low smoke points and will impart a burnt flavor to your delicate spring rolls.

    12. Use a Thermometer

    Precision is the difference between greasy and crispy. Aim for an oil temperature between 350°F and 365°F. If the oil is too cold, the pastry absorbs it like a sponge; if it’s too hot, the outside burns before the inside is heated through.

    13. Fry in Small Batches

    Crowding the pan is a common mistake. Adding too many rolls at once drops the oil temperature significantly, leading to soggy results. Fry only 3–4 rolls at a time to maintain a steady, bubbling heat for that perfect golden finish.

    14. The “Dry Entry” Technique

    Before placing the rolls in the oil, double-check that there are no water droplets on the surface. Moisture causes the oil to splatter violently and prevents the pastry from sealing instantly, which is necessary to keep the interior oil-free and light.

    15. Maintain Constant Motion

    Once the rolls are in the oil, gently turn them frequently using tongs or a slotted spoon. This ensures even browning on all sides and prevents one side from becoming overly saturated with oil while resting on the bottom of the pan.

    16. Drain on a Wire Rack

    Never drain fried spring rolls on paper towels. While it seems logical, the rolls end up sitting in their own extracted oil, creating a soggy bottom. Use a wire cooling rack over a tray so air can circulate entirely around the roll.

    17. The Vertical Drain Method

    For the ultimate non-oily result, stand the spring rolls vertically in a wire basket or a narrow container lined with paper at the very bottom. This allows any residual oil to gravity-drain out of the ends rather than soaking back into the pastry.

    18. Double Frying for Extra Crunch

    If you want professional-grade crispiness, try double frying. Fry them once at a lower temp to cook the inside, let them cool, and then flash-fry them at 375°F for 30 seconds. This creates a remarkably hard, crunchy shell that stays crisp for hours.

    19. Prevent “Sweating”

    If you aren’t serving them immediately, do not cover the rolls with a lid or foil. Trapping the heat creates steam, which will turn your hard-earned crispy crust soft in seconds. Leave them uncovered in a warm oven if you need to hold them.

    20. Reheating Done Right

    If you have leftovers, avoid the microwave at all costs. To restore the crunch, place the spring rolls in an air fryer or a hot oven at 400°F for a few minutes. This draws out any moisture and crisps the wrapper back to its original state.


    SEO Meta Description

    Learn how to make Perfect Spring Rolls with our pro tips for 100% crispy and non-oily results. Master moisture control, oil temperature, and rolling techniques today!

    Focus Keywords

    • Perfect Spring Rolls
    • Crispy Spring Rolls
    • Non-oily frying tips
    • Spring roll wrapper techniques
    • Deep frying temperature
    • Homemade spring rolls

    FAQ Section

    Q: Why do my spring rolls get soggy after frying? A: This usually happens because the filling was too wet or the rolls were drained on paper towels instead of a wire rack. Excess steam or trapped oil softens the pastry.

    Q: Can I bake these instead of frying? A: Yes, though they won’t be as “shatter-crisp.” Brush them generously with oil and bake at 400°F, turning halfway through until golden brown.

    Q: How do I stop my spring rolls from bursting? A: Ensure your filling is cool and dry, and roll them tightly to remove air pockets. Do not overfill the wrappers, as steam needs a little room to move.

    Internal Linking Suggestions

    • 10 Best Dipping Sauces for Homemade Appetizers
    • The Ultimate Guide to Mastering Your Wok at Home
    • Easy Vegetable Stir-Fry: The Perfect Base for Any Meal

    Conclusion

    Achieving Perfect Spring Rolls is a rewarding culinary skill that balances prep work with frying precision. By focusing on moisture removal, maintaining a tight roll, and monitoring your oil temperature, you can eliminate greasiness and enjoy that signature crunch. Whether you are hosting a dinner party or prepping a weekend snack, these pro tips ensure your results are always golden and delicious. Ready to start cooking? I can help you create a custom dipping sauce recipe to pair with your crispy rolls!